Saturday, May 26, 2012

Log4j for Java Web Applications


There are different ways to setup log4j for you web application. Here I will present 2 of ways to setup log4j, particularly aimed at simple java web applications (eg. plain servlets/jsp webapps).

First you can download the following basic log4j.properties file. Just replace <appname> with your application name (eg. FunkyWebApp).


log4j.logger.<appname>logger=DEBUG, C, fileappender


log4j.additivity.<appname>logger=false

log4j.appender.C=org.apache.log4j.ConsoleAppender

log4j.appender.C.layout=org.apache.log4j.PatternLayout

#basic pattern

log4j.appender.C.layout.ConversionPattern=[%c] [%d{dd MMM yyyy - hh:mm:ss}] %5p - %m %n

#advanced pattern (slow)

#log4j.appender.C.layout.ConversionPattern=[%c] [%d{dd MMM yyyy - hh:mm:ss}] %5p - %m - in %M() at line %L of class %C %n


log4j.appender.fileappender=org.apache.log4j.RollingFileAppender

log4j.appender.fileappender.File=${appRootPath}WEB-INF/logs/<appname>.log

log4j.appender.fileappender.MaxFileSize=500KB


## Keep one backup file

log4j.appender.fileappender.MaxBackupIndex=3

log4j.appender.fileappender.layout=org.apache.log4j.PatternLayout

log4j.appender.fileappender.layout.ConversionPattern=%p %t %c - %m%n

#log4j.appender.C.layout.ConversionPattern=[%c] [%d{dd MMM yyyy - hh:mm:ss}] %5p - %m %n

Now use one of the methods below to add and enable Log4J in your web application

Method 1: Use Servlet to initialize log4j

Step 1: Put log4j.properties file in the right place

  • Place 'log4j.properties' into the root of your classpath. See an example web application layout here

Tip: when web application is deployed it should be in /WEB-INF/classes/log4j.properties.

  • If using eclipse place 'log4j.properties' under your project_name/src directory

Step 2: Define the servlet mapping in web.xml

Add the following code to WEB-INF/web.xml


<servlet>

     <servlet-name>log4j-init</servlet-name>

     <servlet-class>com.FunkyWebapp.servlets.Log4jInit</servlet-class>

     <init-param>

       <param-name>log4j-init-file</param-name>

       <param-value>WEB-INF/classes/log4j.properties</param-value>

     </init-param>

     <load-on-startup>1</load-on-startup>

</servlet>

Make sure to change the java class file path to be relevant to your project. 'com.FunkyWebapp.servlets.Log4jInit'

Step 3: Add the servlet you mapped in Step 2 to your application

Add the following servlet to your project


import javax.servlet.http.HttpServlet;

import org.apache.log4j.PropertyConfigurator;


public class Log4jInit extends HttpServlet {


 public void init()

 {

     String prefix =  getServletContext().getRealPath("/");

     String file = getInitParameter("log4j-init-file");


     // if the log4j-init-file context parameter is not set, then no point in trying

     if(file != null){

      PropertyConfigurator.configure(prefix+file);

      System.out.println("Log4J Logging started: " + prefix+file);

     }

     else{

      System.out.println("Log4J Is not configured for your Application: " + prefix + file);

     }    

 }

}

Make sure the <servlet-class> element in Step 2 matches the fully qualified name of your servlet. And make sure it's in the right package.

Step 4: Initialize the logger and start logging from other servlets in your web application


public class MyServlet extends HttpServlet {

...

private Logger log = Logger.getLogger("<appname>logger");

.

.

.

log.debug("Some string to print out");


}

Make sure the <appname> part matches with the line

log4j.logger.<appname>logger in the log4j.properties file

Notes:
When you initialize log4j in a servlet you will only be able to log from classes which are loaded after the servlet (eg. other servlets). You won't be able to do logging from a ServletContextListener for example.

Method 2: Initialize log4j in a ServletContextListener

Step 1: Put properties file in the right place

  • Place 'log4j.properties' into the root of your classpath. See an example web application layout here

Tip: when web application is deployed it should be in /WEB-INF/classes/log4j.properties.

  • If using eclipse place 'log4j.properties' under your project_name/src directory

Step 2: Define a listener mapping in web.xml

Add the following servlet listener mapping in web.xml:


<listener>

  <listener-class>

   com.package.listeners.ApplicationServletContextListener

  </listener-class>

</listener>

Step 3: Add the SerlvetContextListener class to the application


public class ApplicationServletContextListener implements ServletContextListener

{

 public void contextInitialized(ServletContextEvent event)

 {

     ServletContext ctx = e.getServletContext();


  String prefix =  ctx.getRealPath("/");    

  String file = "WEB-INF"+System.getProperty("file.separator")+"classes"+System.getProperty("file.separator")+"log4j.properties";


     if(file != null) {

       PropertyConfigurator.configure(prefix+file);

       System.out.println("Log4J Logging started for application: " + prefix+file);

     }

     else

     {

      System.out.println("Log4J Is not configured for application Application: " + prefix+file);

     }


 }


 public void contextDestroyed(ServletContextEvent event)

 {


 }


}

Step 4: Define the logger and start logging from other servlets in your applications


public class MyServlet extends HttpServlet {

...

private Logger log = Logger.getLogger("<appname>logger");

.

.

.

log.debug("Some string to print out");


}

Notes:

  • Easier to implement that Method 1
  • All web application now has access to log4j (including listeners)
  • Placing log4j initialization in a ServletContextListener allows initialization of log4j when your web application is loaded for the first time.
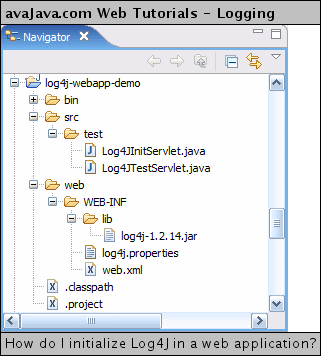
Initialize Log4j in a web application


Here is a web application project to illustrate this. It contains the log4j jarW file in its build path, a log4j.properties file, a web.xmlW file, a log4j initialization servlet, and a test servlet to try out our log4j initialization.
'log4j-webapp-demo' project
Let's start by examining our web.xml file. It contains references to our two servletsW, Log4JTestServlet and Log4JInitServlet. Log4JTestServlet gets mapped to /test so that it can be hit via a browser. The Log4JInitServlet starts up when the web application starts up because of the <load-on-startup> tag. Notice that it has an init-param and an init-value. This value gets passed to the servlet and specifies the location of our log4j.properties file.

web.xml

 
  Log4JTestServlet
  test.Log4JTestServlet
 
 
  Log4JInitServlet
  test.Log4JInitServlet
  
   log4j-properties-location
   WEB-INF/log4j.properties
  
  1
 
 
  Log4JTestServlet
  /test
 

Let's look at the Log4JInitServlet. In its init() method, it reads in the 'log4j-properties-location' init param value. If the init param doesn't exist, the application gets initialized via the BasicConfigurator. If is does exist, it gets the application's web directory location and appends the init param value to that. If the log4j.properties file exists at that location, it initializes log4j via the PropertyConfigurator using the log4j.properties file. If the log4j.properties file doesn't exist, the application gets initialized via the BasicConfigurator.

Log4JInitServlet.java

package test;

import java.io.File;

import javax.servlet.ServletConfig;
import javax.servlet.ServletContext;
import javax.servlet.ServletException;
import javax.servlet.http.HttpServlet;

import org.apache.log4j.BasicConfigurator;
import org.apache.log4j.PropertyConfigurator;

public class Log4JInitServlet extends HttpServlet {

 private static final long serialVersionUID = 1L;

 public void init(ServletConfig config) throws ServletException {
  System.out.println("Log4JInitServlet is initializing log4j");
  String log4jLocation = config.getInitParameter("log4j-properties-location");

  ServletContext sc = config.getServletContext();

  if (log4jLocation == null) {
   System.err.println("*** No log4j-properties-location init param, so initializing log4j with BasicConfigurator");
   BasicConfigurator.configure();
  } else {
   String webAppPath = sc.getRealPath("/");
   String log4jProp = webAppPath + log4jLocation;
   File yoMamaYesThisSaysYoMama = new File(log4jProp);
   if (yoMamaYesThisSaysYoMama.exists()) {
    System.out.println("Initializing log4j with: " + log4jProp);
    PropertyConfigurator.configure(log4jProp);
   } else {
    System.err.println("*** " + log4jProp + " file not found, so initializing log4j with BasicConfigurator");
    BasicConfigurator.configure();
   }
  }
  super.init(config);
 }
}

Here is the log4j.properties file. I described properties files in another tutorial so I won't describe them here.

log4j.properties

# This sets the global logging level and specifies the appenders 
log4j.rootLogger=INFO, myConsoleAppender 
# settings for the console appender 
log4j.appender.myConsoleAppender=org.apache.log4j.ConsoleAppender 
log4j.appender.myConsoleAppender.layout=org.apache.log4j.PatternLayout 
log4j.appender.myConsoleAppender.layout.ConversionPattern=%-4r [%t] %-5p %c %x - %m%n
 
Our test servlet is shown below. It contains a logger called log. Within its doGet() method, it displays the message 'Howdy' in response to a browser request, and it contains calls to log.debug(), log.info(), log.warn(), log.error(), and log.fatal().

Log4JTestServlet.java

package test;

import java.io.IOException;
import java.io.PrintWriter;

import javax.servlet.ServletException;
import javax.servlet.http.HttpServletRequest;
import javax.servlet.http.HttpServletResponse;

import org.apache.log4j.Logger;

public class Log4JTestServlet extends javax.servlet.http.HttpServlet implements javax.servlet.Servlet {

 private static final long serialVersionUID = 1L;
 static Logger log = Logger.getLogger(Log4JTestServlet.class);

 public Log4JTestServlet() {
  super();
 }

 protected void doGet(HttpServletRequest request, HttpServletResponse response) throws ServletException, IOException {
  response.setContentType("text/html");
  PrintWriter out = response.getWriter();
  out.println("Howdy
");
  log.debug("debug message");
  log.info("info message");
  log.warn("warn message");
  log.error("error message");
  log.fatal("fatal message");
 }

}

If we start up the project in EclipseSW with the TomcatSW bootstrap, we see the following console output:

Console Output

Mar 17, 2007 3:37:53 AM org.apache.catalina.core.
AprLifecycleListener lifecycleEvent
INFO: The Apache Tomcat Native library which allows optimal performance in production environments was not found on the java.library.path: C:\jdk1.5.0_09\jre\bin;.;C:\WINDOWS\system32;C:\WINDOWS;C:\WINDOWS\system32;C:\WINDOWS;C:\WINDOWS\System32\Wbem;C:\Program Files\QuickTime\QTSystem\;C:\jdk1.5.0_09\bin;C:\maven-2.0.4\bin;C:\jadnt158;C:\mysql-essential-5.0.27\bin
Mar 17, 2007 3:37:53 AM org.apache.coyote.http11.Http11BaseProtocol init
INFO: Initializing Coyote HTTP/1.1 on http-8080
Mar 17, 2007 3:37:53 AM org.apache.catalina.startup.Catalina load
INFO: Initialization processed in 906 ms
Mar 17, 2007 3:37:53 AM org.apache.catalina.core.StandardService start
INFO: Starting service Catalina
Mar 17, 2007 3:37:54 AM org.apache.catalina.core.StandardEngine start
INFO: Starting Servlet Engine: Apache Tomcat/5.5.20
Mar 17, 2007 3:37:54 AM org.apache.catalina.core.StandardHost start
INFO: XML validation disabled
Log4JInitServlet is initializing log4j
Initializing log4j with: C:\projects\workspace\log4j-webapp-demo\web\WEB-INF/log4j.properties
Mar 17, 2007 3:37:54 AM org.apache.catalina.core.ApplicationContext log
INFO: org.apache.webapp.balancer.BalancerFilter: init(): ruleChain: [org.apache.webapp.balancer.RuleChain: [org.apache.webapp.balancer.rules.URLStringMatchRule: Target string: News / Redirect URL: http://www.cnn.com], [org.apache.webapp.balancer.rules.RequestParameterRule: Target param name: paramName / Target param value: paramValue / Redirect URL: http://www.yahoo.com], [org.apache.webapp.balancer.rules.AcceptEverythingRule: Redirect URL: http://jakarta.apache.org]]
Mar 17, 2007 3:37:55 AM org.apache.catalina.core.ApplicationContext log
INFO: ContextListener: contextInitialized()
Mar 17, 2007 3:37:55 AM org.apache.catalina.core.ApplicationContext log
INFO: SessionListener: contextInitialized()
Mar 17, 2007 3:37:55 AM org.apache.catalina.core.ApplicationContext log
INFO: ContextListener: contextInitialized()
Mar 17, 2007 3:37:55 AM org.apache.catalina.core.ApplicationContext log
INFO: SessionListener: contextInitialized()
Mar 17, 2007 3:37:55 AM org.apache.coyote.http11.Http11BaseProtocol start
INFO: Starting Coyote HTTP/1.1 on http-8080
Mar 17, 2007 3:37:55 AM org.apache.jk.common.ChannelSocket init
INFO: JK: ajp13 listening on /0.0.0.0:8009
Mar 17, 2007 3:37:56 AM org.apache.jk.server.JkMain start
INFO: Jk running ID=0 time=0/94  config=null
Mar 17, 2007 3:37:56 AM org.apache.catalina.storeconfig.StoreLoader load
INFO: Find registry server-registry.xml at classpath resource
Mar 17, 2007 3:37:56 AM org.apache.catalina.startup.Catalina start
INFO: Server startup in 2375 ms
 
In the console output, notice that, among the Tomcat startup messages, our log4j gets initialized, as evidenced by the following lines taken from the above console output:

Log4JInitServlet is initializing log4j
Initializing log4j with: C:\projects\workspace\log4j-webapp-demo\web\WEB-INF/log4j.properties

If we hit our test servletW in a browser window, we see the 'Howdy' message as expected.
Hitting test servlet in browser window
If we now check our console window, we can see the logging messages that were output in the doGet() method of our test servlet. The output is formatted as we specified in the log4j.properties file. Notice that the log.debug() message in doGet() isn't displayed to the console, since our log4j.properties file specified that the log level is INFO.
Console output
Initializing log4j via a servlet that loads on web application start-up is a handy technique for initializing log4j.


Tuesday, May 15, 2012

SQL SERVER – Snapshot Database


A Database Snapshot is a read-only, static view of a database (the source database). Multiple snapshots can exist on a source database and can always reside on the same server instance as the database. Each database snapshot is consistent, in terms of transactions, with the source database as of the moment of the snapshot's creation. A snapshot persists until it is explicitly dropped by the database owner.

If you do not know how Snapshot database work, here is a quick note on the subject. However, please refer to the official description on Book-on-Line for accuracy. Snapshot database is a read-only database created from an original database called the "source database". This database operates at page level. When Snapshot database is created, it is produced on sparse files; in fact, it does not occupy any space (or occupies very little space) in the Operating System. When any data page is modified in the source database, that data page is copied to Snapshot database, making the sparse file size increases. When an unmodified data page is read in the Snapshot database, it actually reads the pages of the original database. In other words, the changes that happen in the source database are reflected in the Snapshot database.

Let us see a simple example of Snapshot. In the following exercise, we will do a few operations. Please note that this script is for demo purposes only- there are a few considerations of CPU, DISK I/O and memory, which will be discussed in the future posts.

  • Create Snapshot
  • Delete Data from Original DB
  • Restore Data from Snapshot

First, let us create the first Snapshot database and observe the sparse file details.

USE master
GO
-- Create Regular Database
CREATE DATABASE RegularDB
GO
USE RegularDB
GO
-- Populate Regular Database with Sample Table
CREATE TABLE FirstTable (ID INT, Value VARCHAR(10))
INSERT INTO FirstTable VALUES(1, 'First');
INSERT INTO FirstTable VALUES(2, 'Second');
INSERT INTO FirstTable VALUES(3, 'Third');
GO
-- Create Snapshot Database
CREATE DATABASE SnapshotDB ON
(Name ='RegularDB',
FileName='c:\SSDB.ss1')
AS SNAPSHOT OF RegularDB;
GO
-- Select from Regular and Snapshot Database
SELECT * FROM RegularDB.dbo.FirstTable;
SELECT * FROM SnapshotDB.dbo.FirstTable;
GO

Now let us see the resultset for the same.

Now let us do delete something from the Original DB and check the same details we checked before.

-- Delete from Regular Database
DELETE FROM RegularDB.dbo.FirstTable;
GO
-- Select from Regular and Snapshot Database
SELECT * FROM RegularDB.dbo.FirstTable;
SELECT * FROM SnapshotDB.dbo.FirstTable;
GO

When we check the details of sparse file created by Snapshot database, we will find some interesting details. The details of Regular DB remain the same.

It clearly shows that when we delete data from Regular/Source DB, it copies the data pages to Snapshot database. This is the reason why the size of the snapshot DB is increased.

Now let us take this small exercise to  the next level and restore our deleted data from Snapshot DB to Original Source DB.

-- Restore Data from Snapshot Database
USE master
GO
RESTORE DATABASE RegularDB
FROM DATABASE_SNAPSHOT = 'SnapshotDB';
GO
-- Select from Regular and Snapshot Database
SELECT * FROM RegularDB.dbo.FirstTable;
SELECT * FROM SnapshotDB.dbo.FirstTable;
GO
-- Clean up
DROP DATABASE [SnapshotDB];
DROP DATABASE [RegularDB];
GO

Now let us check the details of the select statement and we can see that we are successful able to restore the database from Snapshot Database.

We can clearly see that this is a very useful feature in case you would encounter a good business that needs it.

I would like to request the readers to suggest more details if they are using this feature in their business. Also, let me know if you think it can be potentially used to achieve any tasks.

Complete Script of the afore- mentioned operation for easy reference is as follows:

USE master
GO
-- Create Regular Database
CREATE DATABASE RegularDB
GO
USE RegularDB
GO
-- Populate Regular Database with Sample Table
CREATE TABLE FirstTable (ID INT, Value VARCHAR(10))
INSERT INTO FirstTable VALUES(1, 'First');
INSERT INTO FirstTable VALUES(2, 'Second');
INSERT INTO FirstTable VALUES(3, 'Third');
GO
-- Create Snapshot Database
CREATE DATABASE SnapshotDB ON
(Name ='RegularDB',
FileName='c:\SSDB.ss1')
AS SNAPSHOT OF RegularDB;
GO
-- Select from Regular and Snapshot Database
SELECT * FROM RegularDB.dbo.FirstTable;
SELECT * FROM SnapshotDB.dbo.FirstTable;
GO
-- Delete from Regular Database
DELETE FROM RegularDB.dbo.FirstTable;
GO
-- Select from Regular and Snapshot Database
SELECT * FROM RegularDB.dbo.FirstTable;
SELECT * FROM SnapshotDB.dbo.FirstTable;
GO
-- Restore Data from Snapshot Database
USE master
GO
RESTORE DATABASE RegularDB
FROM DATABASE_SNAPSHOT = 'SnapshotDB';
GO
-- Select from Regular and Snapshot Database
SELECT * FROM RegularDB.dbo.FirstTable;
SELECT * FROM SnapshotDB.dbo.FirstTable;
GO
-- Clean up
DROP DATABASE [SnapshotDB];
DROP DATABASE [RegularDB];
GO


Friday, May 11, 2012

Traverse A Collection In Java


There are 3 preferable ways to traverse through a collection and lets see what all are they and when to use them

  1. If you have an iterable and need to traverse unconditionally to all of them, i.e in case where we do not need any indexes or the underlying iterator (i.e. you are only accessing elements, not removing them or modifying the Collection in any way

    for (iterable_type iterable_element : collection)

  2. If you have an iterable but need to conditionally traverse:

    for (Iterator iterator = collection.iterator(); iterator.hasNext();)

  3. If data-structure does not implement iterable:

    for (int i = 0; i < collection.length; i++)


EXAMPLE


public static void traverse(List data) {
    System.out.println("Using simplified for loop/foreach:");
    for(Object obj : data) {
        System.out.println(obj);
    }
 
    System.out.println("Using for loop:");
    for(int i = 0, n = data.size(); i < n; i++) {
        System.out.println(data.get(i));
    }
 
    System.out.println("Using Iterator:");
    for(Iterator it = data.iterator(); it.hasNext();) {
        System.out.println(it.next());
    }
}


Tuesday, May 8, 2012

The Right Collection


Here is a guide for selecting the proper implementation of a Set, List, or Map. It was compiled for Java 1.4. Many additions have been made to the Collections Framework since then (notably the Queue and Deque interfaces, and various items in java.util.concurrent). These later additions have been omitted here, since this briefer summary should suffice for most cases.

The best general purpose or 'primary' implementations are likely ArrayList, LinkedHashMap, and LinkedHashSet. They are marked below as " * ". Their overall performance is better, and you should use them unless you need a special feature provided by another implementation. That special feature is usually ordering or sorting.

Here, "ordering" refers to the order of items returned by an Iterator, and "sorting" refers to sorting items according to Comparable or Comparator.
 

Interface HasDuplicates? Implementations Historical
Set no HashSet ... LinkedHashSet* ... TreeSet
...
List yes ... ArrayList* ... LinkedList
...
Vector, Stack
Map no duplicate keys  HashMap ... LinkedHashMap* ... TreeMap Hashtable, Properties

Principal features of non-primary implementations :

  • HashMap has slightly better performance than LinkedHashMap, but its iteration order is undefined
  • HashSet has slightly better performance than LinkedHashSet, but its iteration order is undefined
  • TreeSet is ordered and sorted, but slow
  • TreeMap is ordered and sorted, but slow
  • LinkedList has fast adding to the start of the list, and fast deletion from the interior via iteration
Iteration order for above implementations :
  • HashSet - undefined
  • HashMap - undefined
  • LinkedHashSet - insertion order
  • LinkedHashMap - insertion order of keys (by default), or 'access order'
  • ArrayList - insertion order
  • LinkedList - insertion order
  • TreeSet - ascending order, according to Comparable / Comparator
  • TreeMap - ascending order of keys, according to Comparable / Comparator
For LinkedHashSet and LinkedHashMap, the re-insertion of an item does not affect insertion order.

For LinkedHashMap, 'access order' is from the least recent access to the most recent access. In this context, only calls to get, put, and putAll constitute an access, and only calls to these methods affect access order.

While being used in a Map or Set, these items must not change state (hence, it is recommended that these items be immutable objects):

  • keys of a Map
  • items in a Set
Sorting requires either that :
  • the stored items implement Comparable
  • a Comparator for the stored objects be defined
To retain the order of a ResultSet as specified in an ORDER BY clause, insert the records into a List or a LinkedHashMap.


Thursday, May 3, 2012

JD-Eclipse Plugin (JAD Eclipse Plugin)


JD-Eclipse

JD-Eclipse is a plug-in for the Eclipse platform. It allows you to display all the Java sources during your debugging process, even if you do not have them all.

JD-Eclipse is free for non-commercial use. This means that JD-Eclipse shall not be included or embedded into commercial software products. Nevertheless, this project may be freely used for personal needs in a commercial or non-commercial environments.

Screenshots


Supported Platforms

  • Windows 32/64-bit
  • Linux 32/64-bit
  • Mac OSX 32/64-bit on x86 hardware

Installation 

Windows Platform Prerequisites

The native library, included into JD-Eclipse for Windows, has been built with Microsoft Visual C++ 2008 Express Edition. Some runtime components of Visual C++ Libraries are required to run the decompiler. You can download and install them from the Microsoft Web site :

Microsoft Visual C++ 2008 SP1 Redistributable Package (x86)

Microsoft Visual C++ 2008 SP1 Redistributable Package (x64)

Eclipse 3.6 Instructions

  1. From the Help menu in Eclipse, select Install New Software... to open an Install dialog window (shown below).


  2. Add a new repository to add JD-Eclipse plug-in:
    1. Click on the Add... button to open the New Repository dialog window.
    2. Type JD-Eclipse Update Site in the site Name text box.
    3. In the URL text box, type the URL for the JD-Eclipse update site: http://java.decompiler.free.fr/jd-eclipse/update (shown below) and click OK.


  3. Check boxes "Java Decompiler Eclipse Plug-in" and "JD-Eclipse Plug-in", and click on Next buttons.
  4. Choose the option to accept the terms of the license agreement (shown below).


  5. Click on the Finish button.
  6. On the Selection Needed dialog window, click on the Select All and Ok buttons.
  7. Restart Eclipse.

Eclipse 3.2, 3.3, 3.5 Instructions

  1. From the Help menu in Eclipse, select Software Updates > Find and Install... to open the Install/Update dialog window (shown below).


  2. On the Install/Update pop-up window, choose the Search for new features to install option, and click on the Next button.
  3. Add a new remote site to add JD-Eclipse plug-in:
    1. Click the New Remote Site... button to open a New Update Site dialog window.
    2. On the New Update Site pop-up window, type JD-Eclipse Update Site in the site Name text box.
    3. In the URL text box, type the URL for the JD-Eclipse update site: http://java.decompiler.free.fr/jd-eclipse/update (shown below) and click OK.


    4. Click on the Finish button to switch to the Updates window.
  4. On the Updates window, check the JD-Eclipse Update Site box (shown below), and click the Finish button.


  5. On the next screen, check the JD-Eclipse Update Site box, and click the Next button.
  6. Choose the option to accept the terms of the license agreement, and click on the Next button.
  7. Click on the Finish button.
  8. Click on the Install All button.

Eclipse installs the JD-Eclipse plug-in. To finish the installation process, follow the prompts to shut down and re-start Eclipse.

Eclipse 3.4 Instructions

Installation of Equinox/p2 plug-in

  1. From the Help menu in Eclipse, select Software Updates... to open an Software Updates and Add-ons pop-up window (shown below).


  2. Select the Available Software tab.
  3. Expand Ganymede tree node.
  4. Expand Uncategorized tree node.
  5. Check Equinox p2 Provisioning tree node (shown below), and click the Install... button.


  6. Click the Finish button.

Installation of JD-Eclipse plug-in

  1. From the Help menu in Eclipse, select Software Updates... to open an Software Updates and Add-ons pop-up window.
  2. Select the Available Software tab.
  3. Add a new remote site to add JD-Eclipse plug-in:
    1. Click the Add Site... button to open a Add Site pop-up window.
    2. In the Location text box, type the URL for the JD-Eclipse update site: http://java.decompiler.free.fr/jd-eclipse/update (shown below) and click OK.


  4. On the Software Updates and Add-ons window, check the JD-Eclipse Plug-in box (shown below), and click the Install... button.


  5. On the next screen, click the Finish button.
  6. On the next screen, check the Java Decompiler Eclipse Plug-in certificate box and click the OK button.

Eclipse installs the JD-Eclipse plug-in. To finish the installation process, follow the prompts to shut down and re-start Eclipse.

Download

Size : 2.62 MB
MD5 checksum : b0595389d3a604b782bb94fc94a93a8b


Bytecode Outline plugin for Eclipse


1) Window -> Show View -> Other -> Java -> Bytecode

to see bytecode of current Java editor/ Class file view. The automatic build for projects should be enabled in order to see generated class files.

If "Link with editor" is on, then any selection in Java editor will be followed with selection of appropriated bytecode label, and vice - versa.

Note: this bi-directional selection could only works, if your bytecode contains source lines/local variables information. Check your compiler setings, if you are not sure that your compiler generates debug information.

If "show raw bytecode" is off, than local variable names will be shown instead of indexes, full qualified names replaced with simply class names, and primitive type abbreviations decoded to readable names.

If "show current element only" is on, then only bytecode of current field/method node will be shown (if cursor is placed inside field/method name or body).

2.1) Select two *.class/*.java files -> right click -> Compare with -> Each Other Bytecode

2.2) Select one *.class/*.java file -> right click -> Compare with -> Another Class Bytecode

to compare bytecode of selected class files. Compare works also for *.class files included in any referenced *.jar library.

"Toggle ASMifier mode on/off" button on both Bytecode Outline and Compare View shows ASMifier java code, that generates selected bytecode. More information about how to use ASMifier you can find here.

Note: if ASMifier mode is "on", then selection of java code cannot be folowed by selection of appropriated bytecode instruction, and vice - versa; the "show raw bytecode" action is also meaningless.

3) Window -> Show View -> Other -> Java -> Bytecode reference

to see reference documentation to selected bytecode instruction in the bytecode view. This documentation is taken from "Java Virtual Machine" by Jon Meyer & Troy Downing Copyright (c) 1997 by O'Reilly & Associates, and provided with permission of O'Reilly Media, Inc. Packaging, cleanup, reformatting and XSL transformation completed by Eugene Kuleshov (eu@javatx.org).

4) Help -> Help contents -> JVM Instruction Reference

to see the entire bytecode reference documentation, provided with BCO plugin.