Wednesday, June 23, 2010

Windows Server 2008 SMTP Service logging


I was working on installing Windows Server 2008 x64 edition.  I discovered the SMTP Service wasn't logging.  SMTP was working and emails were going out.  My install is 'custom' and installs just the modules we needed.  Turns out, there is a small dependency on the ODBC logging module so the SMTP service logging would work.  More importantly iislog.dll.  Here are the instructions to fix and reproduce the behavior.

To correct it.  I'm assuming you have the SMTP Service already installed and it's not logging.

1) Install ODBC Logging module (role service in Server Manager)

2) Stop / Start the SMTP Service

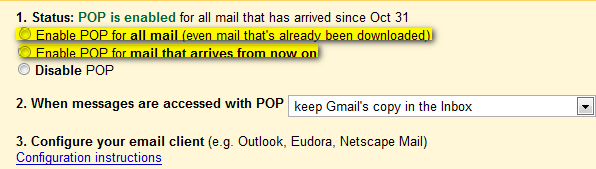
3) Verify your SMTP service is configured for logging.  It's not on by default.

4) Try a local telnet test (assuming the telnet client is installed)

5) Look at your log folder.

To Reproduce the logging 'behavior'

1) Install Windows Server 2008 (obvious step)

2) Install the basic web server components. (static content with anonymous user)

3) Install telnet client and SMTP services

4) Enable logging on SMTP instance

5) try a telnet test locally

6) Verify the smtpsvc folder isn't in the location you configured for logging (default is c:\windows\system32\logfiles)

7) Add the ODBC logging module (no iisreset is required) *Or in my tests there wasn't

8) Stop / Start the SMTP service (net stop smtpsvc && net start smtpsvc)

9) Try another telnet test

10) Verify the SMTPSVC folder is present.


Installing and Configuring Windows Server 2008 SMTP


Installing SMTP Server Feature on Windows 2008 is an easy process requiring only few steps to complete. On this article we will describe a step by step configuration and installation of the SMTP Server feature and how to enable the smtp to relay from local server.

Step 1:
Opening Server Manager Console and under Features select Add Features

Step 2:
Selecting SMTP Server option


Step 3:
Click on Install wait until finish and click close

Step 4:
Waiting for installation to finish and clicking on Close


Step 5:
Opening IIS 6.0 Manager under Administrative Tools -> Internet Information Services 6.0


Step 6:
Under [SMTP Virtual Server] second mouse click and properties


Step 7:
Select Relay under Access Tab


Step 8:
Select Only the list below and click on Add button


Step 9:
Enter IP Address 127.0.0.1 for relay


Step 10:
Sending a manual email through telnet to confirm everything working successfully. Telnet localhost 25 or telnet yourpublicip 25 and make sure you open the specific port on your firewall to be available to public.


Friday, June 18, 2010

How to escape special characters in java


Often times, we encountered some special characters or arbitrary text placed in an HTML tag that resulting an invalid HTML output. The special characters often needs to be altered or escape to ensure the resulting HTML is still valid.

Special characters as follow
1) <
2) >
3) "
4) '
5) \
6) &

Here i want to introduce a handy-ready java library call StringEscapeUtils which included in commons-lang.jar library, and used to escape special characters in Java.

P.S Please download the commons-lang.jar library in http://commons.apache.org/lang/

Here is the source code to demonstrate how to escape special characters with StringEscapeUtils class.

import org.apache.commons.lang.StringEscapeUtils;
 
public class testEscapeHTML{
 
public static void main(String args[]){
 
String testStr = "< > \" &";
 
System.out.println("Original : " + testStr);
 
System.out.println("Escaped : " + StringEscapeUtils.escapeHtml(testStr));
 
}
}

Result

Original : < > " &
Escaped : &lt; &gt; &quot; &amp;

JCE Encryption – Data Encryption Standard (DES)


Here i demonstrate how do use the Java Cryptography Extension (JCE) to encrypt and decrypt a text in Data Encryption Standard (DES) mechanism.

1.) Create a DES Key.

    KeyGenerator keygenerator = KeyGenerator.getInstance("DES");
SecretKey myDesKey = keygenerator.generateKey();

2.) Create a Cipher instance from Cipher class, we have to specify the following information and separated by a slashes (/).

1. Algorithm name
2. Mode (optional)
3. Padding scheme (optional)

    Cipher desCipher;
// Create the cipher
desCipher = Cipher.getInstance("DES/ECB/PKCS5Padding");

DES = Data Encryption Standard
ECB = Electronic Codebook mode
PKCS5Padding = PKCS #5-style padding

In this example, we create a DES (Data Encryption Standard) cipher in Electronic Codebook mode, with PKCS #5-style padding.

3.) Convert String into Byte[] array format.

    byte[] text = "No body can see me".getBytes();

4.) Make Cipher in encrypt mode, and encrypt it with Cipher.doFinal() method.

    desCipher.init(Cipher.ENCRYPT_MODE, myDesKey);
byte[] textEncrypted = desCipher.doFinal(text);

5.) Make Cipher in decrypt mode, and decrypt it with Cipher.doFinal() method as well.

    desCipher.init(Cipher.DECRYPT_MODE, myDesKey);
byte[] textDecrypted = desCipher.doFinal(textEncrypted);

Full Example of how do use Java's JCE to encrypt and decrypt text in DES mechanism.

package com.mkyong.util;
 
import java.security.InvalidKeyException;
import java.security.NoSuchAlgorithmException;
 
import javax.crypto.BadPaddingException;
import javax.crypto.Cipher;
import javax.crypto.IllegalBlockSizeException;
import javax.crypto.KeyGenerator;
import javax.crypto.NoSuchPaddingException;
import javax.crypto.SecretKey;
 
public class JEncrytion
{
public static void main(String[] argv) {
 
try{
 
KeyGenerator keygenerator = KeyGenerator.getInstance("DES");
SecretKey myDesKey = keygenerator.generateKey();
 
Cipher desCipher;
 
// Create the cipher
desCipher = Cipher.getInstance("DES/ECB/PKCS5Padding");
 
// Initialize the cipher for encryption
desCipher.init(Cipher.ENCRYPT_MODE, myDesKey);
 
//sensitive information
byte[] text = "No body can see me".getBytes();
 
System.out.println("Text [Byte Format] : " + text);
System.out.println("Text : " + new String(text));
 
// Encrypt the text
byte[] textEncrypted = desCipher.doFinal(text);
 
System.out.println("Text Encryted : " + textEncrypted);
 
// Initialize the same cipher for decryption
desCipher.init(Cipher.DECRYPT_MODE, myDesKey);
 
// Decrypt the text
byte[] textDecrypted = desCipher.doFinal(textEncrypted);
 
System.out.println("Text Decryted : " + new String(textDecrypted));
 
}catch(NoSuchAlgorithmException e){
e.printStackTrace();
}catch(NoSuchPaddingException e){
e.printStackTrace();
}catch(InvalidKeyException e){
e.printStackTrace();
}catch(IllegalBlockSizeException e){
e.printStackTrace();
}catch(BadPaddingException e){
e.printStackTrace();
}
 
}
}

Output

Text [Byte Format] : [B@19b5393
Text : No body can see me
Text Encryted : [B@4e79f1
Text Decryted : No body can see me

Thursday, June 17, 2010

Java Web Start (Jnlp) Tutorial


Here is a brief explanation about Java Web Start from SUN
"Java Web Start is a mechanism for program delivery through a standard Web server. Typically initiated through the browser, these programs are deployed to the client and executed outside the scope of the browser. Once deployed, the programs do not need to be downloaded again, and they can automatically download updates on startup without requiring the user to go through the whole installation process again."
This Java Web Start (Jnlp) Tutorial – UnOfficial Guide will guide you to do following
1) Create a simple AWT program and jar it as TestJnlp.jar
2) Add keystore into TestJnlp.jar
3) Create a Jnlp file
4) Put all into Tomcat Folder
5) Access TestJnlp.jar from web through http://localhost:8080/Test.Jnlp

Tutorial

1. Install JDk and Tomcat

Install Java JDK/JRE version above 1.5 and Tomcat.

2. Create AWT file and file structure

Create file structure as following
TestJnlp.java
Create a new Java file, and put into the specified folder location, see above picture.
package com.mkyong;
 
import java.awt.*;
import javax.swing.*;
import java.net.*;
import javax.jnlp.*;
import java.awt.event.ActionListener;
import java.awt.event.ActionEvent;
 
public class TestJnlp {
static BasicService basicService = null;
public static void main(String args[]) {
JFrame frame = new JFrame("Mkyong Jnlp UnOfficial Guide");
frame.setDefaultCloseOperation(JFrame.EXIT_ON_CLOSE);
JLabel label = new JLabel();
Container content = frame.getContentPane();
content.add(label, BorderLayout.CENTER);
String message = "Jnln Hello Word";
 
label.setText(message);
 
try {
basicService = (BasicService)
ServiceManager.lookup("javax.jnlp.BasicService");
} catch (UnavailableServiceException e) {
System.err.println("Lookup failed: " + e);
}
 
JButton button = new JButton("http://www.rgcollege.com");
 
ActionListener listener = new ActionListener() {
public void actionPerformed(ActionEvent actionEvent) {
try {
URL url = new URL(actionEvent.getActionCommand());
basicService.showDocument(url);
} catch (MalformedURLException ignored) {
}
}
};
 
button.addActionListener(listener);
 
content.add(button, BorderLayout.SOUTH);
frame.pack();
frame.show();
}
}
P.S If "import javax.jnlp.*;" not found, please include jnlp library which located at JRE/lib/javaws.jar.

3. Jar It

Located the Java's classes file folder and issue following command in command prompt
jar -cf TestJnlp.jar *.*
This is pack all the Java's classes into a new jar file , TestJnlp.jar.

4. Create keystore

Add a new keystore named "testkeys"
keytool -genkey -keystore testKeys -alias jdc
It will ask for keystore password, first name, last name , organization's unit…etc..just fill them all.

5. Assign keystore to Jar file

Attached newly keystore "testkeys" to TestJnlp.jar file
jarsigner -keystore testKeys TestJnlp.jar jdc
It will ask password for your newly created keystore

6. Deploy JAR it

Copy TestJnlp.jar to Tomcat's default web server folder.
C:\Program Files\Apache\Tomcat 6.0\webapps\ROOT

7. Create JNLP file

Create a new Test.jnlp file in order to execute TestJnlp.jar.
<?xml version="1.0" encoding="utf-8"?> 
<jnlp spec="1.0+" codebase="http://localhost:8080/" href="Test.jnlp">
<information>
<title>Jnlp Testing</title>
<vendor>YONG MOOK KIM</vendor>
<homepage href="http://localhost:8080/" />
<description>Testing Testing</description>
</information>
<security>
<all-permissions/>
</security>
<resources>
<j2se version="1.6+" />
<jar href="TestJnlp.jar" />
</resources>
<application-desc main-class="com.mkyong.TestJnlp" />
</jnlp>
Configuration is quite simple, please change accordingly.

8. Deploy JNLP file

Copy Test.jnlp to tomcat default web server folder also.
C:\Program Files\Apache\Tomcat 6.0\webapps\ROOT

9. Start Tomcat

C:\Tomcat folder\bin\tomcat6.exe
P.S Latest Tomcat like version 6, it already configure jnlp in web.xml properly. If jnlp is not response, please add following statement in your web.xml which located in tomcat conf folder.
  <mime-mapping>
<extension>jnlp</extension>
<mime-type>application/x-java-jnlp-file</mime-type>
</mime-mapping>

10. Test it

Access URL http://localhost:8080/Test.jnlp, download Test.jnlp and double click on it

11. Output

It will run as following if everything go fine
If you want to execute it again, just double click on Test.jnlp that you downloaded just now, it is no need to visit http://localhost:8080/Test.jnlp again

Monday, June 14, 2010

Windows Mail for Windows 7


E-mail Account Setup Guide


  1. In Windows Mail, go to the Tools menu and click on Accounts....
  2. Click on the Add button in the upper right.
  3. In the Select Account Type window, double-click on E-mail Account.
  4. In the Your Name window, type in the name you want your recipients to see when they receive your e-mails, then click on Next.
  5. In the Internet E-mail Address window, type in your e-mail address, then click on Next.
  6. In the Set up e-mail servers window, enter the e-mail server information as shown below, replacing "user1234" with your username.
  7. In the Internet Mail Logon window, enter your Internet ID and password for your e-mail account (you don't need to enter the password, but if you do, you will automatically log on to the e-mail server everytime you open Windows Mail as long as the check is in the box next to Remember Password).
  8. You should see the following screen; check the Do not download my e-mail and folders at this time box, then click Finish.
  9. You should now end up at the Internet Accounts screen; double-click on your e-mail account.
  10. At the top of the Properties window that appears, click on the Advanced tab and verify your settings are the same as in the image below.
  11. Now click on the IMAP tab and, in the Root folder path: blank, enter mail/. Also uncheck the box for Check for new messages in all folders.
  12. Click Ok to save all of these settings, then Close to exit the Internet Accounts window. Windows Mail will now ask you if you would like to retrieve your mail.
  13. Congratulations, you have successfully set up Windows Mail to handle your e-mail!

Configuring Delete and Trash Settings


  1. Go to the Tools menu and click on Options....
  2. Click on the Advanced tab at the top, then click on the Maintenance button.

  3. Check the top two checkboxes for Empty messages from the 'Deleted Items' folder on exit and Purge deleted messages when leaving IMAP folders. Click on Close when you are done.
  4. Windows Mail will now delete your unwanted mail automatically when you exit the program.

Configure Windows Mail to connect to Gmail


Continuing our "How to" series on configuring Windows Mail for different e-mail providers, today we are going to show you, step by step, how to configure Windows Mail to connect to your Gmail account. As you might now, Gmail offers free POP3 support for all accounts. However, in order to use it, you might need to activate it from the Gmail web interface.

How to activate POP3 in Gmail

Before starting, please check if POP3 is activated for your Gmail account. To check, login to your account and go to Settings -> Forwarding and POP/IMAP.

Gmail

Now activate your POP3 service by selecting one of these two options: Enable POP for all mail, or Enable POP for mail that arrives from now on.

Gmail


How to configure Windows Mail

First, start Windows Mail. Go to the Tools menu and then click on the Accounts button as shown in the picture below.

Windows Mail

Then, click on the Add button.

Windows Mail

Select the E-mail Account option and click on Next.

Windows Mail

Next you can choose the display name that will be shown in every outgoing e-mail message. Type it and go to the next window.

Windows Mail

Now, you will be asked for your e-mail address. Type it and click on Next.

Windows Mail

In the next window you have to setup the e-mail servers. From the Incoming e-mail server drop-down list, select POP3. Then, enter the Incoming & Outgoing server names as shown in the picture below and check the Outgoing server requires authentication option. When you are done, click on Next.

Windows Mail

In the Internet Mail Logon window you have to enter your e-mail address and password. Also, for your ease-of-use, check the Remember password option and then click on Next.

Windows Mail

You are now almost done. Check the Do not download my e-mail at this time option as you will have to make some other minor adjustments. Then, click on the Finish button.

Windows Mail

The Internet Accounts window should be opened. Select your Gmail account and click on Properties.

Windows Mail

Go to the Advanced tab and type 465 as the port for the SMTP server and 995 for the POP3 server. Also, please note that you have to check the option that says "This server requires a secure connection (SSL)" for both POP3 and SMTP.

If you want your messages to be left on the Gmail servers as backup, then don't forget to check the option that says Leave a copy of messages on server. If you do not check it, when a message is downloaded it is automatically removed from the Gmail servers. When finished, click on OK.

Windows Mail

Windows Mail is now configured to access your Gmail account and download your messages. Press the Send/Receive button and the download will start.


Windows Server 2008 Mail Configuration


Windows Mail is Microsoft's current implementation of the built-in e-mail client (previous versions of Windows had Outlook Express). While hardly a competitor against the full fledged Outlook e-mail client, Windows Mail has some nice features that still make it useful even when using Outlook as the main e-mail client. One of these is its ability to read newsgroups, meaning connect to NNTP-based servers.
Newsgroups are still being used all over the world as alternatives to web-based forums and mailing lists. Some of the newsgroups I frequent (in read-only mode, or as an active contributor) are Microsoft's Online Newsgroups (used for community support), and a few MCT and MVP newsgroups (the latter are for MCTs and MVPs only, respectively).
So imagine my wonder when a couple of weeks ago I went to the Start menu, typed "Mail" as I have for the past year or more, and no Windows Mail icon was displayed.
windows-mail-gone-1
It's worth noting that the following screenshots were taken on my Windows Server 2008-based laptop computer that I use at home. This computer was customized to act as a workstation (watch for more info on this in  upcoming articles).
Another thing I've noticed but have not had time yet to fully explore, is that the same thing has suddenly happened to my Windows 7 RC laptop as well. I do not know why, and I haven't yet begun to pinpoint the reason, but when I do I'll post an article about it.
Immediately after seeing that the Windows Mail application was gone, I opened Windows Explorer at the C:\Program Files\Windows Mail path. The application was still there, but no icons for it anywhere in the Start menu. Funny thing is that I can swear that I've used it just a week before, so having it do a Houdini trick on my kind of pissed me off.
windows-mail-gone-17

So how do I get Windows Mail back?

Well, on Windows Server 2008 it's quite easy. You need to install the Desktop Experience. But what if it's already installed? Then remove it, reboot, reinstall, then reboot again. Windows 7 needs some further investigation.
On Windows Server 2008, to uninstall Desktop Experience, use Server Manager > Features > Remove Features.
windows-mail-gone-2
windows-mail-gone-3
windows-mail-gone-4
When finished, reboot the computer.
After rebooting, log on and Server Manager will automatically start. Wait till it finishes the configuration. You can notice that the desktop theme is now gone. No worry, we'll get it back in a minute.
windows-mail-gone-7
windows-mail-gone-8
Now re-install Desktop Experience by using Server Manager > Features > Add Features.
windows-mail-gone-9
windows-mail-gone-10
windows-mail-gone-11
windows-mail-gone-12
When finished, reboot the computer.
Once again, after rebooting, log on and Server Manager will automatically start. Wait till it finishes the configuration. You'll notice that the desktop theme is back.
windows-mail-gone-15
Now look at the Start menu: