Settings with TortoiseSVN
Here will show you how to make Tortoise use Beyond Compare for merges and comparisons.
If you don't have Beyond Compare, GET IT NOW!. Don't believe me that you should get it? Fine, stick with TortoiseMerge.
If you don't have Beyond Compare, GET IT NOW!. Don't believe me that you should get it? Fine, stick with TortoiseMerge.
- Right-click anywhere in Windows Explorer and select "Settings" from the "TortoiseSVN" context menu.

- In the settings window find the "External Programs" node in the left pane. Select "Diff Viewer".

- In both sections select the "External" radio button and paste the following path and command line arguments:
If 64-bit machine:
"C:\Program Files (x86)\Beyond Compare 3\BComp.exe" %base %mine /title1=%bname /title2=%yname /leftreadonly
If 32-bit machine:
"C:\Program Files\Beyond Compare 3\BComp.exe" %base %mine /title1=%bname /title2=%yname /leftreadonly
- Next select "Merge Tool" in the left pane.

- Again select the "External" radio button, then paste the following path and command line arguments in the field:
If 64-bit machine:
"C:\Program Files (x86)\Beyond Compare 3\BComp.exe" %mine %theirs "" %merged /title1=%yname /title2=%tname /title4="Output"
If 32-bit machine:
"C:\Program Files\Beyond Compare 3\BComp.exe" %mine %theirs "" %merged /title1=%yname /title2=%tname /title4="Output"
- Click OK to save your changes. TortoiseSVN will now use Beyond Compare when doing diffs and resolving conflicts.
Mapping an Existing Branch (trunk in this example):
- Create a new folder somewhere on your computer named "trunk".
- Right-click your new folder and select "SVN Checkout".

- In "URL of repository", put in the path to your SVN repository.

- Click OK and you will see a window showing each file that it pulls down.
 If you get any errors (they appear in red) then double check the path to your SVN repository.
Updating Your Working Copy (trunk in this example):
- Updating your working copy is easy. Simply right-click the working copy you wish to update and select "SVN Update" from the context menu.

- You will be presented with a results window showing every file that is being affected by this update. If there are any conflicts with files that you have not checked in then you can resolve them here.

Committing Changes (to trunk in this example):
- After you have made changes to a file you will notice that it's green check mark icon becomes a red exclamation point, indicating that there are pending changes that have not been committed to the repository.

- When you are confident that your changes are in working order then you are free to commit them to your repository. Simply right-click the working copy and select "SVN Commit" from the context menu.

- You will be presented with a commit window. Write a comprehensive message describing all changes being made in this commit. Double-check the list of files being committed to ensure you are only committing what you intend to. Then click OK.

- When you see the results window then you are done and your changes have been committed to the repository.

Creating a New Branch (from trunk in this example):
- Ensure the branch you would like to branch from is up to date. Right-click it and select "SVN Update" to get the latest updates.
- Right-click the mapped branch that you would like to create a branch from and select "Branch/Tag" from within the "TortoiseSVN" menu item.

- You should be presented with a "Copy (Branch / Tag)" window. Modify "To URL:" to the path you want your branch to be created. By default "Specific revision in repository" is selected and the revision number is set to the latest revision. For our purposes we will leave this at default values.
 Include a log message that others will see when they look at the history of your new branch.
 - Click OK and Tortoise will begin creating your new branch.

- Notice the message it gives you when it finishes. You have two options. Your branch has been created in the repository but it is not mapped on your local hard drive. You can either switch the working copy you just branched from so that it points to the new branch instead of trunk.Or you can create a new folder with your branch name and follow the steps in "Mapping an Existing Branch" to map the new branch to that folder. Most of the time you will want to keep trunk mapped and create a new folder to map your branch to, but if you want to switch the currently mapped trunk folder to your new branch, simply right-click trunk and select "Switch" from the "TortoiseSVN" context menu item.
 You will be presented with a window that shows the working copy path and the SVN URL it is mapped to. Simply modify the URL to point to your new branch. That's all you have to do.
Merging Trunk to Your Branch (in a normal situation this should be done daily):
- Right-click the branch you want to merge to and select "Merge" from the "TortoiseSVN" context menu.

- You will be presented with a merge window with three options: "Merge a range of revisions", "Reintegrate a branch", and "Merge two different trees". For the purposes of this section we want the first option, "Merge a range of revisions".

- Select "Next" and you will see a screen allowing you to select the URL you wish to merge from. By default it is set to the same URL as the branch you are merging to. Obviously that would be silly to merge the same branch into itself. Modify the "URL to merge from" to point to trunk.
 Leave all other options alone, we want their defaults.
 - You will then get a screen with merge options. We do not want to touch any of these options, leave them set to their default values.

- If you are worried about the results of the merge you can select "Test merge" in the dialog above. This will perform the same steps as it would in an actual merge but in the end it will only give you statistics about what happened in the merge, but it does not actually perform the merge. This will tell you if you have a lot of conflicts. Usually, even if there are conflicts, we know we are going to perform the merge no matter what anyway so for now let's just skip that and click "Merge". When the merge is finished you will get a screen showing you the results of the merge and allowing you to resolve conflicts if there were any (see "Resolving Conflicts" for more information).

- Now that you have finished merging your branch should have pending changes to be committed. REMEMBER: Until you commit your changes by right-clicking your branch and selecting "SVN Commit" your merge only exists in your working copy. If someone else pulls down your branch and you have not committed after doing a merge, then that person will not see the result of your merge. Don't forget to commit after doing a merge and resolving all conflicts.
Resolving Conflicts (updating and merging are common sources of conflicts)
Note: This applies to anywhere conflicts arise, updates and merges are the most common places for conflicts to occur. Conflicts happen when you have modified a file and someone else has modified the same file. When it tries to update/merge that file it sees both changes and marks the file as conflicted, allowing you to decide what to do. To simulate this, I have modified the file in my "Experimental" branch and also modified the same file in my "trunk" branch. I have committed the change in each branch and I will now perform my daily merge from trunk to my branch.
- Oh no! We have a conflict. Let's fix it. During the merge when a conflict is encountered, depending on your settings, Tortoise may pop up a window like this:
 This window allows you to resolve conflicts as they are found during the merge. Here is a description of each option:
Use Local - If you are positive that you want your branch's file and none of the changes coming from trunk, use this.
Use Repository - If you are positive that you want the file from trunk to overwrite any changes your branch may have made to the file since the last merge, use this.
Edit Conflict - This is the most commonly used option. It will open up your diff tool (Beyond Compare 3 in our case) and show you the differences between the file coming from trunk and the one in your branch. If you are not sure which file you want, use this option.
Resolved - This option is only available after you have used "Edit Conflict" and saved the result. Use this when you are satisfied you have resolved the conflict in Beyond Compare.
Resolve Later - This leaves the file marked as conflicted and lets you resolve it later. Use this if you prefer to wait until the merge is done and then resolve this conflict in the result window.
Resolve All Later - This is the same as the previous option except it will prevent this window from appearing if it finds more conflicts during this merge. Use this if you prefer to wait until the merge is done and then resolve conflicts file by file in the result window. - If you don't see the dialog above, don't worry. You will still be notified of conflicts in the result window and you can resolve them here.
 Simply right-click conflicts in the window and select "Edit Conflict" from the context menu.
- You can then use your diff tool (Beyond Compare 3 in our case) to resolve conflicts and save the results.
 When you are satisfied a conflict has been resolved, right-click the conflict again and select "Mark as resolved" from the context menu. If you want to take a whole file instead of using your diff tool, select either "Resolve conflict using 'theirs'" or "Resolve conflict using 'mine'" from the context menu. Those options will save the respective file and mark the conflict resolved.
 - Once all conflicts have been resolved you are free to commit your changes.
Re-integrating a Branch ("Experimental" branch merging back to "trunk" in this example):
- Before re-integrating a branch ensure that you have committed all desired changes to your branch.
- Merge up from trunk to your branch. Don't forget! You must merge trunk into your branch first before you merge your branch back to trunk. This is an important step because it allows you to get all updates from trunk and resolve conflicts all within your own branch. After you complete the merge you can commit the merge changes to your branch. Once you have the latest from trunk and the merge has been committed, then you can begin re-integration of your branch to trunk.
- To begin re-integration right-click trunk and select "SVN Merge" from the "TortoiseSVN" context menu.
- You will see the same window you saw in "Merging Trunk to Your Branch". Only this time we are going to select "Reintegrate a branch" instead of "Merge a range of revisions".

- Click "Next" and you will see a place to put in the URL of your branch.

- Click "Next" and you will see a window with merge options and the ability to perform a "Test merge". Leave all these set to their defaults and click "Merge". You will see the results of your merge. If you merged trunk into your branch before reintegrating then you shouldn't see any conflicts (unless you were unlucky enough to have someone else commit some changes to trunk in the few seconds between you merging trunk up to your branch and the reintegration back to trunk). If you do have some conflicts, simply resolve them like you normally would.

Icon Overlays
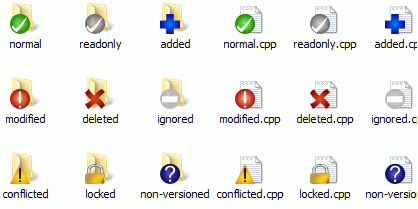
Now that you have checked out a working copy from a Subversion repository you can see your files in the windows explorer with changed icons. This is one of the reasons why TortoiseSVN is so popular. TortoiseSVN adds a so called overlay icon to each file icon which overlaps the original file icon. Depending on the Subversion status of the file the overlay icon is different.

A fresh checked out working copy has a green checkmark as overlay. That means the Subversion status is normal.

As soon as you start editing a file, the status changes to modified and the icon overlay then changes to a red exclamation mark. That way you can easily see which files were changed since you last updated your working copy and need to be committed.

If during an update a conflict occurs then the icon changes to a yellow exclamation mark.

If you have set the
svn:needs-lock property on a file, Subversion makes that file read-only until you get a lock on that file. Such files have this overlay to indicate that you have to get a lock first before you can edit that file.
If you hold a lock on a file, and the Subversion status is normal, this icon overlay reminds you that you should release the lock if you are not using it to allow others to commit their changes to the file.

This icon shows you that some files or folders inside the current folder have been scheduled to be deleted from version control or a file under version control is missing in a folder.

The plus sign tells you that a file or folder has been scheduled to be added to version control.

The bar sign tells you that a file or folder is ignored for version control purposes. This overlay is optional.

This icon shows files and folders which are not under version control, but have not been ignored. This overlay is optional.
In fact, you may find that not all of these icons are used on your system. This is because the number of overlays allowed by Windows is very limited and if you are also using an old version of TortoiseCVS, then there are not enough overlay slots available. TortoiseSVN tries to be a “Good Citizen (TM)” and limits its use of overlays to give other apps a chance too.
Now that there are more Tortoise clients around (TortoiseCVS, TortoiseHg, ...) the icon limit becomes a real problem. To work around this, the TortoiseSVN project introduced a common shared icon set, loaded as a DLL, which can be used by all Tortoise clients. Check with your client provider to see if this has been integrated yet :-)
Local and Remote Status
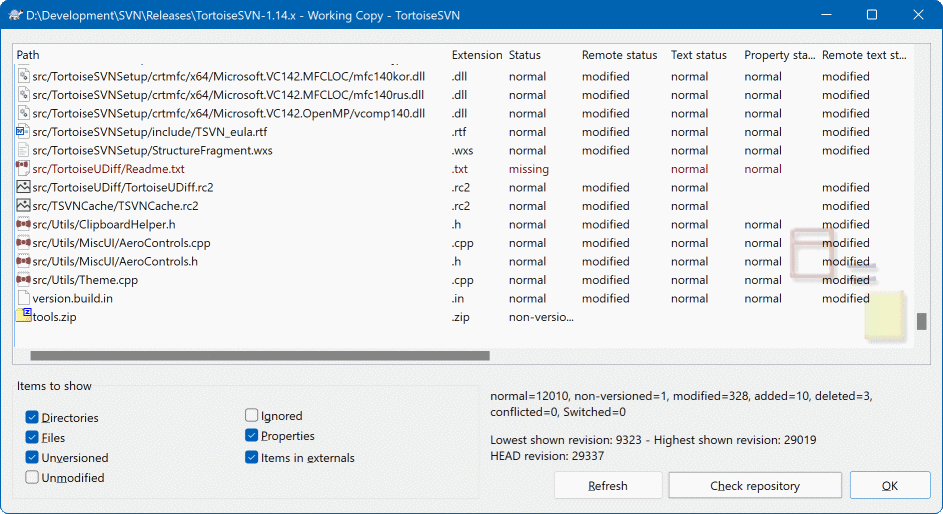
It's often very useful to know which files you have changed and also which files got changed and committed by others. That's where the command → comes in handy. This dialog will show you every file that has changed in any way in your working copy, as well as any unversioned files you may have.
If you click on the then you can also look for changes in the repository. That way you can check before an update if there's a possible conflict. You can also update selected files from the repository without updating the whole folder. By default, the button only fetches the remote status with the checkout depth of the working copy. If you want to see all files and folders in the repository, even those you have not checked out, then you have to hold down the Shift key when you click on the button.
The dialog uses colour coding to highlight the status.
- Blue
- Locally modified items.
- Purple
- Added items. Items which have been added with history have a
+sign in the Text status column, and a tooltip shows where the item was copied from. - Dark red
- Deleted or missing items.
- Green
- Items modified locally and in the repository. The changes will be merged on update. These may produce conflicts on update.
- Bright red
- Items modified locally and deleted in repository, or modified in repository and deleted locally. These will produce conflicts on update.
- Black
- Unchanged and unversioned items.
No comments:
Post a Comment